Showing posts with label Blogger Hack. Show all posts

How To Shorten Your Links Using Your Own Domain Name

Of course we all know about Adf.ly and how it can make money for us by just shortening. It works well with me. Every end of the month, Adf.ly will credit my earning to my Paypal account. But, for who don't have idea what is Adf.ly is about, read my article in the previous post

Adf.ly just added new tool to their users which called Domain. This tool will allow you use to use your own custom domain names or sub domains with Adf.ly service. There are many benefits for doing this:

Website branding - if your blog is URL is http://www.wrestling.com, your adf.ly links could now look like http://go.wrestling.com/Ad3g
Greater number of clicks - people are starting to associate an adf.ly link with advertising and may not click a link for this reason.
Peace of mind - you own the domain and can download an Excel export of all of your URLs. If you were worried adf.ly may disappear one day (it won't!) then you are in full control.
Low profile - in the past Twitter and other services have had problems with adf.ly links. If you use a custom domain, an automated scan will not detect adf.ly links on your account.

People will no more face problems with Facebook or Twitter or any other website Blocking Adf.ly. It adds more credibility to your shortened links so your visitors, when they see your domain name, will trust it and go for it .

LET'S START
1. First of all, you will need Adf.ly account. Register for free here.

2. Then go to the Cpanel of your website => DNS Zone Editor => Add a new CNAME RECORD

3. In the Name section, enter any subdomain you want but not an existing one. In the Value*, enter the following adress custom.adf.ly

4. Save the CNAME. Now, you're done with CNAME.

5. Return to your Adf.ly account. Go to Tools => Domains => Create / manage domains

6. Enter your sub-domain in the box and Add Custom Domain

7. Congratz! Now, you should see your sub domain listed in the domain section. You can start making money with your Adf.ly.

With this feature, Adf.ly links is look trusted and visitor has no worries to click it.

+Share it to recommend it! :D

How To Remove Links From Blogger Comments Automatically With jQuery

Every blogger hates spammer. So to combating them is by preventing the use of HTML-based codes that enables the embedding of hyperlinked texts. You can remove links from blogger comments Automatically with jQuery. Simply follow the instructions below.

#STEPS:
1. Go to Dashboard ->> Template ->>; Edit HTML

2. Search this code (Ctrl + F), </body>, and then copy/paste the code below just right above it.
<script src='https://ajax.googleapis.com/ajax/libs/jquery/1.8.3/jquery.min.js'/>
<script>$('.comment-content a[rel$=nofollow]').replaceWith(function(){return ($(this).text());});</script>

3. If you want the hyperlinked texts removed entirely than just disabling the hyperlinked text, then copy/paste this code below instead.
<script src='https://ajax.googleapis.com/ajax/libs/jquery/1.8.3/jquery.min.js'/>
<script>$('.comment-content a[rel$=nofollow]').hide());</script>

NOTE: If you already have the part that’s highlighted already in your template’s code then exclude it and just copy the remainder of the code.

4. Save your template. That’s it. Done!

Share it to your friends!

Install Lazy Load in Blogger

If your blog or website containing many images, Lazy Load will be very helpful to you. It can reduce the page loading time of your site. Lazy loader is a jQuery plugin written in JavaScript. It delays loading of images in (long) web pages. Images outside of viewport (visible part of web page) wont be loaded before user scrolls to them. Using lazy load on long web pages containing many large images makes the page load faster. Browser will be in ready state after loading visible images. In some cases it can also help to reduce server load. Lazy Load is a famous plugin for wordpress blogger.


#Steps:
1. Go to Dashboard ->> Design ->>; Edit HTML

2. Search this code (Ctrl + F), </head>

3. Then, paste the code below, before </head>
&lt;script charset=&#39;utf-8&#39; src=&#39;http://ajax.googleapis.com/ajax/libs/jquery/1.9.0/jquery.min.js&#39; type=&#39;text/javascript&#39;/&gt;

&lt;script type=&#39;text/javascript&#39;&gt;
//&lt;![CDATA[

/*
 * Lazy Load - jQuery plugin for lazy loading images
 *
 * Copyright (c) 2007-2009 Mika Tuupola
 *
 * Licensed under the MIT license:
 *   http://www.opensource.org/licenses/mit-license.php
 *
 * Project home:
 *   http://www.appelsiini.net/projects/lazyload
 *
 * Version:  1.5.0
 *
 */
(function($) {

    $.fn.lazyload = function(options) {
        var settings = {
            threshold    : 0,
            failurelimit : 0,
            event        : &quot;scroll&quot;,
            effect       : &quot;show&quot;,
            container    : window
        };
              
        if(options) {
            $.extend(settings, options);
        }

        /* Fire one scroll event per scroll. Not one scroll event per image. */
        var elements = this;
        if (&quot;scroll&quot; == settings.event) {
            $(settings.container).bind(&quot;scroll&quot;, function(event) {
              
                var counter = 0;
                elements.each(function() {
                    if ($.abovethetop(this, settings) ||
                        $.leftofbegin(this, settings)) {
                            /* Nothing. */
                    } else if (!$.belowthefold(this, settings) &amp;&amp;
                        !$.rightoffold(this, settings)) {
                            $(this).trigger(&quot;appear&quot;);
                    } else {
                        if (counter   &gt; settings.failurelimit) {
                            return false;
                        }
                    }
                });
                /* Remove image from array so it is not looped next time. */
                var temp = $.grep(elements, function(element) {
                    return !element.loaded;
                });
                elements = $(temp);
            });
        }
      
        this.each(function() {
            var self = this;
          
            /* Save original only if it is not defined in HTML. */
            if (undefined == $(self).attr(&quot;original&quot;)) {
                $(self).attr(&quot;original&quot;, $(self).attr(&quot;src&quot;));   
            }

            if (&quot;scroll&quot; != settings.event ||
                    undefined == $(self).attr(&quot;src&quot;) ||
                    settings.placeholder == $(self).attr(&quot;src&quot;) ||
                    ($.abovethetop(self, settings) ||
                     $.leftofbegin(self, settings) ||
                     $.belowthefold(self, settings) ||
                     $.rightoffold(self, settings) )) {
                      
                if (settings.placeholder) {
                    $(self).attr(&quot;src&quot;, settings.placeholder);    
                } else {
                    $(self).removeAttr(&quot;src&quot;);
                }
                self.loaded = false;
            } else {
                self.loaded = true;
            }
          
            /* When appear is triggered load original image. */
            $(self).one(&quot;appear&quot;, function() {
                if (!this.loaded) {
                    $(&quot;&lt;img /&gt;&quot;)
                        .bind(&quot;load&quot;, function() {
                            $(self)
                                .hide()
                                .attr(&quot;src&quot;, $(self).attr(&quot;original&quot;))
                                [settings.effect](settings.effectspeed);
                            self.loaded = true;
                        })
                        .attr(&quot;src&quot;, $(self).attr(&quot;original&quot;));
                };
            });

            /* When wanted event is triggered load original image */
            /* by triggering appear.                              */
            if (&quot;scroll&quot; != settings.event) {
                $(self).bind(settings.event, function(event) {
                    if (!self.loaded) {
                        $(self).trigger(&quot;appear&quot;);
                    }
                });
            }
        });
      
        /* Force initial check if images should appear. */
        $(settings.container).trigger(settings.event);
      
        return this;

    };

    /* Convenience methods in jQuery namespace.           */
    /* Use as  $.belowthefold(element, {threshold : 100, container : window}) */

    $.belowthefold = function(element, settings) {
        if (settings.container === undefined || settings.container === window) {
            var fold = $(window).height()   $(window).scrollTop();
        } else {
            var fold = $(settings.container).offset().top   $(settings.container).height();
        }
        return fold &lt;= $(element).offset().top - settings.threshold;
    };
  
    $.rightoffold = function(element, settings) {
        if (settings.container === undefined || settings.container === window) {
            var fold = $(window).width()   $(window).scrollLeft();
        } else {
            var fold = $(settings.container).offset().left   $(settings.container).width();
        }
        return fold &lt;= $(element).offset().left - settings.threshold;
    };
      
    $.abovethetop = function(element, settings) {
        if (settings.container === undefined || settings.container === window) {
            var fold = $(window).scrollTop();
        } else {
            var fold = $(settings.container).offset().top;
        }
        return fold &gt;= $(element).offset().top   settings.threshold    $(element).height();
    };
  
    $.leftofbegin = function(element, settings) {
        if (settings.container === undefined || settings.container === window) {
            var fold = $(window).scrollLeft();
        } else {
            var fold = $(settings.container).offset().left;
        }
        return fold &gt;= $(element).offset().left   settings.threshold   $(element).width();
    };
    /* Custom selectors for your convenience.   */
    /* Use as $(&quot;img:below-the-fold&quot;).something() */

    $.extend($.expr[&#39;:&#39;], {
        &quot;below-the-fold&quot; : &quot;$.belowthefold(a, {threshold : 0, container: window})&quot;,
        &quot;above-the-fold&quot; : &quot;!$.belowthefold(a, {threshold : 0, container: window})&quot;,
        &quot;right-of-fold&quot;  : &quot;$.rightoffold(a, {threshold : 0, container: window})&quot;,
        &quot;left-of-fold&quot;   : &quot;!$.rightoffold(a, {threshold : 0, container: window})&quot;
    });
  
})(jQuery);

//]]&gt;
&lt;/script&gt;

&lt;script charset=&#39;utf-8&#39; type=&#39;text/javascript&#39;&gt;

$(function() {

   $(&amp;quot;img&amp;quot;).lazyload({placeholder : &amp;quot;https://blogger.googleusercontent.com/img/b/R29vZ2xl/AVvXsEgfRVXmTp5ikwn7UNLqsza79px1CvPaaHnoWQug0hQWqn3g3i69PehRyZBkwRa5HzN_HIdMQE80HLLbUgqa1WhqrFd3omj_g3NO0uYRtd9OnVZn7ZkH7F2Y6QHWEcnu8gPa-Crxckm7j1Y/s1600/grey.gif&amp;quot;,threshold : 200});

});

&lt;/script&gt;

4. Save your template.

Refresh your blog to see the result. Finish!

Enjoy boss!

How To Hide Blog Posts From Blogger Home Page

Blog post is the main item sholud have in blogger main page. But if you have some idea to your blog theme and want to hide the blog post. This tutorial is just for you.


#steps:
1. Go to Dashborad => Design => Edit HTML (Edit Template HTML)

2. Search this code (Ctrl + F), ]]></b:skin>. Paste the code below after ]]></b:skin>.

<b:if cond="data:blog.url == data:blog.homepageUrl">
<style type="text/css">
.post, .sidebar, #blog-pager {display:none;}
</style>
</b:if>
<b:if cond="data:blog.url == data:blog.homepageUrl">
<style type="text/css">
body#layout .sidebar {display:inline;margin-top:200px;}
</style>
</b:if>

With the code, you hide your blog post and sidebar. If you want to show your sidebar, just remove the .sidebar, code.

3. Save and finish. Refresh to see the result.

Like and share man! :)

+credit: Anandz.co.in

How To Add Popular Post Widget Like Wordpress in Blogger

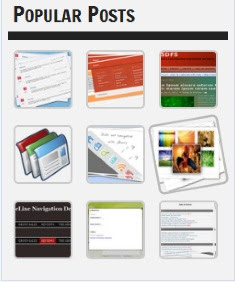
Multi-colored Popular Post widget on wordpress was very charming and colorful. Now blogger users also can use this widget. We also use this widget in this blog. You also definitely will love it. 


Note: Before making any changes to your template, take a full backup of your blogger template.

#Step:
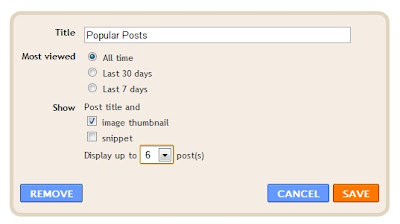
1. Go to Dashboard ->> Layout ->> Add a gadget ->> POPULAR POST


2. Save. Now, go to Template ->> Edit HTML

3. Click Expand Widget Template. Search this code (Ctrl + F), 

/* Variable definitions
====================
4. Just under the code, paste this code below:
<Variable name="PopularPosts.background.color1" description="background color1" type="color" default="#fa4242" value="#ff4c54"/>
<Variable name="PopularPosts.background.color2" description="background color2" type="color" default="#ee6107" value="#ff764c"/>
<Variable name="PopularPosts.background.color3" description="background color3" type="color" default="#f0f" value="#ffde4c"/>
<Variable name="PopularPosts.background.color4" description="background color4" type="color" default="#ff0" value="#c7f25f"/>
<Variable name="PopularPosts.background.color5" description="background color5" type="color" default="#0ff" value="#33c9f7"/>
<Variable name="PopularPosts.background.color6" description="background color6" type="color" default="#ff0" value="#7ee3c7"/>
<Variable name="PopularPosts.background.color7" description="background color7" type="color" default="#ff0" value="#f6993d"/>
5. Then, search this code (Ctrl + F), ]]></b:skin>. Paste the code below before it.
#PopularPosts1 ul{margin:0;padding:5px 0;list-style-type:none}
#PopularPosts1 ul li{position:relative;margin:5px 0;border:0;padding:10px}
#PopularPosts1 ul li:first-child{background:$(PopularPosts.background.color1);width:90%}
#PopularPosts1 ul li:first-child:after{content:"1"}
#PopularPosts1 ul li:first-child   li{background:$(PopularPosts.background.color2);width:85%}
#PopularPosts1 ul li:first-child   li:after{content:"2"}
#PopularPosts1 ul li:first-child   li   li{background:$(PopularPosts.background.color3);width:80%}
#PopularPosts1 ul li:first-child   li   li:after{content:"3"}
#PopularPosts1 ul li:first-child   li   li   li{background:$(PopularPosts.background.color4);width:75%}
#PopularPosts1 ul li:first-child   li   li   li:after{content:"4"}
#PopularPosts1 ul li:first-child   li   li   li   li{background:$(PopularPosts.background.color5);width:70%}
#PopularPosts1 ul li:first-child   li   li   li   li:after{content:"5"}
#PopularPosts1 ul li:first-child   li   li   li   li  li{background:$(PopularPosts.background.color6);width:65%}
#PopularPosts1 ul li:first-child   li   li   li   li   li:after{content:"6"}
#PopularPosts1 ul li:first-child   li   li   li   li   li  li{background:$(PopularPosts.background.color7);width:60%}
#PopularPosts1 ul li:first-child   li   li   li   li   li   li:after{content:"7"}
#PopularPosts1 ul li:first-child:after,
#PopularPosts1 ul li:first-child   li:after,
#PopularPosts1 ul li:first-child   li   li:after,
#PopularPosts1 ul li:first-child   li   li   li:after,
#PopularPosts1 ul li:first-child   li   li   li   li:after,
#PopularPosts1 ul li:first-child   li   li   li   li   li:after,
#PopularPosts1 ul li:first-child   li   li   li   li   li   li:after{position:absolute;top:20px;right:-15px;border-radius:50%;background:#353535;width:30px;height:30px;line-height:1em;text-align:center;font-size:28px;color:#fff}
#PopularPosts1 ul li .item-thumbnail{float:left;border:0;margin-right:10px;background:transparent;padding:0;width:40px;height:40px}
#PopularPosts1 ul li a{font-size:12px;color:#444;text-decoration:none}
#PopularPosts1 ul li a:hover{color:#222;text-decoration:none}
#PopularPosts1 img{-webkit-transition:all 0.5s ease;-moz-transition:all 0.5s ease;transition:all 0.5s ease;padding:4px;background: #eee;background: -webkit-gradient(linear, left top, left bottom, from(#eee), color-stop(0.5, #ddd), color-stop(0.5, #c0c0c0), to(#aaa));background: -moz-linear-gradient(top, #eee, #ddd 50%, #c0c0c0 50%, #aaa);-webkit-border-radius: 4px;-moz-border-radius: 4px;border-radius: 4px;-webkit-box-shadow: 0 0 3px rgba(0,0,0,.7);-moz-box-shadow: 0 0 3px rgba(0,0,0,.7);box-shadow: 0 0 3px rgba(0,0,0,.7);}
#PopularPosts1 img:hover{-moz-transform: scale(1.2) rotate(-350deg);-webkit-transform: scale(1.2) rotate(-350deg);-o-transform: scale(1.2) rotate(-350deg);-ms-transform: scale(1.2) rotate(-350deg);transform: scale(1.2) rotate(-350deg);-webkit-box-shadow: 0 0 20px rgba(255,0,0,.4), inset 0 0 20px rgba(255,255,255,1);-moz-box-shadow: 0 0 20px rgba(255,0,0,.4), inset 0 0 20px rgba(255,255,255,1);box-shadow: 0 0 20px rgba(255,0,0,.4), inset 0 0 20px rgba(255,255,255,1);}
.JayRyan-moresubs {
background: none repeat scroll 0 0 #EBEBEB;
border-style: solid;
border-width: 1px;
border-color: #fff #ccc #ccc;
padding: 3px 8px 3px 3px;
text-align: right;
font-size: 7px;
letter-spacing: 1px;
}
.JayRyan-moresubs a {
display: inline-block;
font-weight: bold;
color: #1E598E;
text-decoration: none;
text-shadow: 1px 1px 1px #fff;
}
6. Then, highlight this code. From <b:widget id='PopularPosts1' to </b:widget>
<b:widget id='PopularPosts1'

-----------

</b:includable>
</b:widget>
7. Replace the higjligted code with this code:
<b:widget id='PopularPosts1' locked='false' title='Top 3 Of The Week' type='PopularPosts'>
<b:includable id='main'>
<b:if cond='data:title'>
<h2><data:title/></h2>
</b:if>
<div class='widget-content popular-posts'>
<ul>
<b:loop values='data:posts' var='post'>
<li>
<b:if cond='data:showThumbnails == &quot;false&quot;'>
<b:if cond='data:showSnippets == &quot;false&quot;'>
<a expr:href='data:post.href' expr:title='data:post.title' rel='bookmark'><data:post.title/></a>
<b:else/>
<a expr:href='data:post.href' expr:title='data:post.snippet' rel='bookmark'><data:post.title/></a>
</b:if>
<b:else/>
<b:if cond='data:showSnippets == &quot;false&quot;'>
<b:if cond='data:post.thumbnail'>
<img class='item-thumbnail' expr:alt='data:post.title' expr:src='data:post.thumbnail'/>
<b:else/>
<img alt='no image' class='item-thumbnail' src='https://blogger.googleusercontent.com/img/b/R29vZ2xl/AVvXsEjrPLsJsea3y_TMSPLYv6lCu4ql1UE7aMy_pjyZt0U43mwEMBnd5rDwwFMANCBAzv_haskbEHeoz7_Od6VG-Q1hv-C9a8T2Y5Kw9x0zLNSI5rd5ghH-E2UifniHlTjQZxJx1k0vj5cMBts/s1600/Default..Logo.png'/>
</b:if>
<a expr:href='data:post.href' expr:title='data:post.title' rel='bookmark'><data:post.title/></a>
<div class='clear'/>
<b:else/>
<b:if cond='data:post.thumbnail'>
<img class='item-thumbnail' expr:alt='data:post.title' expr:src='data:post.thumbnail'/>
<b:else/>
<img alt='no image' class='item-thumbnail' src='https://blogger.googleusercontent.com/img/b/R29vZ2xl/AVvXsEjrPLsJsea3y_TMSPLYv6lCu4ql1UE7aMy_pjyZt0U43mwEMBnd5rDwwFMANCBAzv_haskbEHeoz7_Od6VG-Q1hv-C9a8T2Y5Kw9x0zLNSI5rd5ghH-E2UifniHlTjQZxJx1k0vj5cMBts/s1600/Default..Logo.png'/>
</b:if>
<a expr:href='data:post.href' expr:title='data:post.snippet' rel='bookmark'><data:post.title/></a>
<div class='clear'/>
</b:if>
</b:if>
</li>
</b:loop>
</ul>
</div>
<div class='JayRyan-moresubs'>
<a href=' '> </a>
</div>
</b:includable>
</b:widget>

8. Save it. Done!

Refresh your blog to see the result.

• You can show up to 7 most popular entries.
• You can change the background color of the popular posts widget, going to Design >> Template Designer >> Advanced >> PopularPostsBackground and select any color you want.

Share it to recommend it!

How To Integrate Facebook Comment Box in Blogger

Recently Facebook has launched many social plugins and web developers for bloggers. Their much improved Facebook comment box. Facebook comment box is one of the useful tool for bloggers to increase conversations. So, if you interested to integrate Facebook comment box on your blog and change blogger comment into Facebook comment box? This entry is just exact for you. Let's do it.

Note : Before make any changes, back up your template.

1. Visit Facebook Developer Page. Enter your blog name, URL and click on Create application.


2. After that, copy the APP ID.


3. Then, go to Edit Setting


4. If you using blogspot, follow below instruction,


5. But if you using other domain like .com, follow instruction below,


6. Save your App.


ADD FACEBOOK COMMENT BOX

1. Go To Blogger >> Design ->> Edit HTML

2. Check the "Expand Widget Templates" box


3. Search for <html and just after it add this code,

xmlns:fb='http://www.facebook.com/2008/fbml'

4. Now search (Ctrl+F) for,
<body>

5. Just after it, add the below code,
<div id='fb-root'/>
<script>
    window.fbAsyncInit = function() {
    FB.init({
      appId  : &#39;YOUR_APP_ID&#39;,
      status : true, // check login status
        cookie : true, // enable cookies to allow the server to access the   session
      xfbml  : true  // parse XFBML
    });
  };
    (function() {
    var e = document.createElement(&#39;script&#39;);
      e.src = document.location.protocol     &#39;//connect.facebook.net/en_US/all.js&#39;;
    e.async = true;
      document.getElementById(&#39;fb-root&#39;).appendChild(e);
    }());
</script>

6. Change YOUR_APP_ID with your App ID number.

7. And then, search (Ctrl+F) </head> and just above it paste the below code,
<meta expr:content='data:blog.pageTitle' property='og:title'/>
<meta expr:content='data:blog.url' property='og:url'/>
<meta content='YOUR BLOG NAME' property='og:site_name'/>
<meta content='BLOG-LOGO-IMAGE-LINK' property='og:image'/>
<meta content='YOUR_APP_ID' property='fb:app_id'/>
<meta content='http://www.facebook.com/YOUR _FACEBOOK_USERNAME' property='fb:admins'/>
<meta content='article' property='og:type'/>

Replace the red code with your details.

8. Now, search (Ctrl+F) for this ;
<b:includable id='comment-form' var='post'>

9. After it paste the code given below,
<b:if cond='data:blog.pageType == &quot;item&quot;'>
<div style='padding:0px 0px 0px 0px; margin:0px 0px 0px 0px;'><script src='http://connect.facebook.net/en_US/all.js#xfbml=1'/>
<div> <fb:comments  colorscheme='light' expr:href='data:post.url' expr:title='data:post.title' expr:xid='data:post.id' width='520'/></div>
</div>
</b:if>

If you want to use the dark scheme replace light with dark

To change the comments box width, change this value width='520'

#UPDATE
10. Search (Ctrl+F) <fb:comments

11. Replace it with,
<script src='http://connect.facebook.net/en_US/all.js#xfbml=1'/> <fb:comments migrated='1'
12. Save your template.


HIDE BLOGGER COMMENT

Now you need to hide default blogger commenting system. So navigate to Settings > Comments and select hide and save settings.


DONE! See the result.

With this, your previous blogger comment will be hidden.


Do you like it? Recommend it!

How To Enable Threaded Comment in Blogger Custom Template

Recently, blogger had update new feature which is threaded comment. If you use template from blogger you will see your blogger comment in threaded style. So, if you want to add threaded comment in costume template, just follow this instruction.


APPLY THREADED COMMENT IN COSTUME TEMPLATE
1. Go to Dashboard ->> Layout ->> Edit HTML

2. Search this code (Ctrl + F),
<b:if cond='data:blog.pageType == &quot;item&quot;'>
  <b:include data='post' name='comments'/>
</b:if> 
#maybe this code will appear twice.

3.Replace it with this code,
<b:if cond='data:blog.pageType == &quot;static_page&quot;'>
<b:if cond='data:post.showThreadedComments'>
<b:include data='post' name='threaded_comments'/>
<b:else/>
<b:include data='post' name='comments'/>
</b:if>
</b:if>
<b:if cond='data:blog.pageType == &quot;item&quot;'>
<b:if cond='data:post.showThreadedComments'>
<b:include data='post' name='threaded_comments'/>
<b:else/>
<b:include data='post' name='comments'/>
</b:if>
</b:if>
#so replace the provided code twice.

4. Customize your threaded comment, search (Ctrl+F) this tag,

<b:includable id='threaded_comment_css'>
.
.
.
.
until </b:includable>

6. And then replace it with  this CSS [click].

7. Save your template. Refresh your blog to see the result.

Any problem, just leave your comment. :)

How To Add jQuery Scroll To Top Widget in Blogger

This widget is made your visitor to easier scroll to top of the page by click on it. It's nice and smooth. It only show up when you scroll the page. I also put this widget in HOW-TO HOUSE. So, let's add it now.

Add the Scroll to top jQuery script

1. Go to Dashboard ->> Design ->>; Edit HTML

2. Search this code (Ctrl + F), </head>

3. Then, paste the code below after </head>
<script src='https://ajax.googleapis.com/ajax/libs/jquery/1.6.1/jquery.min.js' type='text/javascript'/>
<style type='text/css'>#w2btoTop {display:none;text-decoration:none;position:fixed;bottom:10px;right:10px;overflow:hidden;width:51px;height:51px;border:none;text-indent:-999px;background:url(https://blogger.googleusercontent.com/img/b/R29vZ2xl/AVvXsEgIew84lw9wfOC__5ePUsgUnngc9cNyD8BSLHHOOH-AaPvvZ89wW116AVi_W_7vhjJuc1X2EzqiXr19G00-fHILyqFhGLUIJv3WFPXkWl0xSakspIF04tprrK9WMR7eW7LUR65PUlm8uyGJ/) no-repeat left top;}#w2btoTopHover {background:url(https://blogger.googleusercontent.com/img/b/R29vZ2xl/AVvXsEgIew84lw9wfOC__5ePUsgUnngc9cNyD8BSLHHOOH-AaPvvZ89wW116AVi_W_7vhjJuc1X2EzqiXr19G00-fHILyqFhGLUIJv3WFPXkWl0xSakspIF04tprrK9WMR7eW7LUR65PUlm8uyGJ/) no-repeat left -51px;width:51px;height:51px;display:block;overflow:hidden;float:left;opacity: 0;-moz-opacity: 0;filter:alpha(opacity=0);}#w2btoTop:active, #w2btoTop:focus {outline:none;}</style><script src='http://bloggerblogwidgets.googlecode.com/files/w2b_jquery.ui.totop.js' type='text/javascript'/><script type='text/javascript'>$(document).ready(function(){ $().UItoTop({ easingType: &#39;easeOutCubic&#39; }); }); </script> 

4. Save your template.

Refresh your blog to see the result. Finish!

How To Add Flash Animated Label Tags Cloud in Blogger


Blogger has a Labels tag widget to show your category of entries. This hack will show your labels tag in flash animated. Displaying animated cloud is a cool way of showing your tags in a limited space. Let's do it!

1. Go to Dashboard ->> Design ->> Edit HTML

2. Search this code (Ctrl + F),
<b:section class='sidebar' id='sidebar' preferred='yes'> 

3. Then, paste the code below after <b:section class='sidebar' id='sidebar' preferred='yes'> tag.
 <b:widget id='Label99' locked='false' title='Labels' type='Label'><b:includable id='main'><b:if cond='data:title'><h2><data:title/></h2></b:if><div class='widget-content'><script src='http://halotemplates.s3.amazonaws.com/wp-cumulus-example/swfobject.js' type='text/javascript'/><div id='flashcontent'></div><script type='text/javascript'>var so = new SWFObject(&quot;http://halotemplates.s3.amazonaws.com/wp-cumulus-example/tagcloud.swf&quot;, &quot;tagcloud&quot;, &quot;240&quot;, &quot;300&quot;, &quot;7&quot;, &quot;#ffffff&quot;);// uncomment next line to enable transparency//so.addParam(&quot;wmode&quot;, &quot;transparent&quot;);so.addVariable(&quot;tcolor&quot;, &quot;0x333333&quot;);so.addVariable(&quot;mode&quot;, &quot;tags&quot;);so.addVariable(&quot;distr&quot;, &quot;true&quot;);so.addVariable(&quot;tspeed&quot;, &quot;100&quot;);so.addVariable(&quot;tagcloud&quot;, &quot;<tags><b:loop values='data:labels' var='label'><a expr:href='data:label.url' style='12'><data:label.name/></a></b:loop></tags>&quot;);so.addParam(&quot;allowScriptAccess&quot;, &quot;always&quot;);so.write(&quot;flashcontent&quot;);</script><b:include name='quickedit'/></div></b:includable></b:widget>

4. Save your template.

Refresh your blog to see the result. Finish!

Leave your comment friends! :)

How To Stop Google Photo Indexing in Blogger

You can easily prevent Google from indexing  photo from your blog by doing below steps. Let's know how.

1. Go to Dashboard ->> Layout ->> Edit HTML

2.
Search this code (Ctrl + F), <head>

3. Copy below code and paste it after the
<head> tag .

<meta content='noimageindex' name='robots'/>

4. Save template. Finish.

Yeah!

How To Create Spinning Popular Post Widget in Blogger

Yes. It is very nice effect to have to your Popular Post widget. Whwn you hover your cursor to the Post, the image will zooming anda spinning. You can have it by follow this steps.


SEE DEMO

1. Go to Dashboard ->> Design ->> Edit HTML

2.
Search this code (Ctrl + F), ]]></b:skin>

3. Copy below code and paste it just after
]]></b:skin> tag,
<style type='text/css'>
.PopularPosts ul li {background: none repeat scroll 0 0 transparent;float: left;list-style: none outside none;margin: 5px !important;padding: 0 !important;}
.PopularPosts ul li img {padding:0;-moz-border-radius: 5px;-webkit-border-radius: 5px;border-radius: 5px;-webkit-transition: all 0.3s ease;-moz-transition: all 0.3s ease;transition: all 0.3s ease;border: 2px solid #CCC;height: 80px;width: 80px;}
.PopularPosts ul li img:hover {border:2px solid #BBB;-moz-transform: scale(1.2) rotate(-1090deg) ;-webkit-transform: scale(1.2) rotate(-1090deg) ;-o-transform: scale(1.2) rotate(-1090deg) ;-ms-transform: scale(1.2) rotate(-1090deg) ;transform: scale(1.2) rotate(-1090deg) ;}
</style>
Note: Make sure you add Popular Posts widget to your blogger sidebar. 

4. Now save your template,

5. Edit your Popular Posts widget setting into something like this...


6. Save it.


Refresh your blog to see the result. Cool huh? Good job!


Leave your comment!

How To Create Google Plus Fan Page For Blogger

Google Plus has launch a Google Plus Fan Page. It's similar to Facebook Fan Page. You can use Google Plus Fan Page for business to promote your products, events, etc. This is how to create and add it into your blog.

Create Google + Fan Page
1. First, go to this page, click on the Product or Brand.

2. Enter the Blog Title and URL, select Category

3. Tick the Agree Page Terms check-box and Click on Create Button.

4. Enter the Tagline and Upload a Profile photo.

6. You're page is almost done, click the Share on Google+ button and Finally Click the Finish button.


Add Fan Page Badge to your Blog
Grow your fans or follower by adding this badge to your blog.

1. Go to Get Started page, click the get the Badge link.

2. Choose a Style of Badge and Language (Leave the Advanced options to Default).


3. There is 2 code to add into your blog.
4. Go to Blogger Dashboard > Design > Edit HTML
5. Search for the </head> tag, add the Code #1 section before it.
6. Save your template.
7. Then, add the Code2 section in HTML/JavaScript gadget and place where you want the badge to be appear.

Finish. That's it! Enjoy! Leave your comment yeah!

How To Change Linkwithin "You might also like" Message in Blooger

Do you have Linkwithin Related post widget? You want to change the Linkwithin message to another message? Sure you can. Only add some code into it. Let's know how.


Add the red code, above your Linkwithin code:
<script>linkwithin_text='YOUR NEW LINKWITHIN MESSAGE :'</script>
YOUR LINKWITHIN CODE

Yeah, that's all you need. Refresh to see the result.

Hope you like it.

How To Add Scroll For Blog Archive in Blogger

Salam.

Your blog archive is too damn long to the bottom? Do you wanna add a scroll to your blog? Yes, you just to do this few steps to make your blog archive looks like this.


STEPS:
1. Go to your Dashboard >> Design >> Edit HTML >> Check Expand Widget Templates.

2. Search this code (Ctrl + F), ]]></b:skin>

3. Put this code below, after ]]></b:skin>
#BlogArchive1 .widget-content{
height:300px;
width:auto;
overflow:auto;
}

4. You can change the scroll height by edit the code in red:

5. Save. Refresh to see the result.


+ For more tutorial, just see through the labels.

How To Make Facebook Like Box Like Wordpress

Wanna have Facebook Like Box like this? Just like in Wordpress. Watch DEMO [click]


You only need to follow this few steps. Let's start.

INSTRUCTION:
1. Go to your Dashboard >> Design >> Page Element >> Add a Gadget.


2. Paste this code in.
<center>
<iframe frameborder="0" href="%0A%0AYOUR FAN PAGE URL%0A%0A" scrolling="no" src="http://www.facebook.com/plugins/fan.php?id=%0A%YOUR FAN PAGE ID%0A%0A&amp;width=292&amp;height=250&amp;connections=25&amp;stream=false&amp;header=false&amp;logobar=false&amp;css=http://howtohouse.googlecode.com/files/fblike.css" style="height: 230px; width: 85%;"></iframe>
<iframe allowtransparency="true" frameborder="0" scrolling="no" src="http://www.facebook.com/plugins/like.php?href=%0A%0AYOUR FAN PAGE URL%0A%0A&amp;send=false&amp;layout=standard&amp;width=292&amp;show_faces=false&amp;action=like&amp;colorscheme=light&amp;font&amp;height=40" style="border: none; height: 40px; overflow: hidden; width: 250px;"></iframe></center>
3. Change:
YOUR FAN PAGE URL- Where to find? Just go to your fan page. Copy URL in the URL bar.


YOUR FAN PAGE ID - On your fan page, click on the Edit Info and copy the ID from the URL bar.


4. Save and FINISH!

Do you like it? ENJOY!

How To Create jQuery Content Slider in Blogger

Do you know what is content slider? It's like a slideshow. You can watch the demo.


Like it? Let's add it.

Steps:
1. Go to your Dashboard >> Design >> Edit HTML >> Check Expand Widget Templates.

2. Search this code (Ctrl + F), ]]></b:skin>

3. Copy below code and paste it just before the ]]></b:skin> tag.
#contentSlide {
border: 1px solid #000;
background:#212421;
height:263px;
padding:10px 0;
}
#slideshow {
margin:0 auto;
width:640px;
height:263px;
background:transparent url(http://lh6.ggpht.com/_dfnTVAxeWMI/SlTPJpS_axI/AAAAAAAABYA/JS60KVWJ9GQ/bg_slideshow.jpg) no-repeat 0 0;
position:relative;
}
#slideshow #slidesContainer {
margin:0 auto;
width:560px;
height:263px;
overflow:auto; /* allow scrollbar */
position:relative;
}
#slideshow #slidesContainer .slide {
margin:0 auto;
width:540px; /* reduce by 20 pixels of #slidesContainer to avoid horizontal scroll */
height:263px;
}
.control {
display:block;
width:39px;
height:263px;
text-indent:-10000px;
position:absolute;
cursor: pointer;
}
#leftControl {
top:0;
left:0;
background:transparent url(http://lh6.ggpht.com/_dfnTVAxeWMI/SlT8KH99FgI/AAAAAAAABZM/e9gXvHjzltU/control_left.jpg) no-repeat 0 0;
}
#rightControl {
top:0;
right:0;
background:transparent url(http://lh6.ggpht.com/_dfnTVAxeWMI/SlT8KMpFpxI/AAAAAAAABZQ/a207Rx0XuiU/control_right.jpg) no-repeat 0 0;
}

.slide h2, .slide p {
margin:15px;
}
.slide h2 {
font:italic 24px Georgia, "Times New Roman", Times, serif;
color:#212421;
letter-spacing:-1px;
}
.slide img {
float:right;
margin:0 15px;
padding: 1px;
background-color: #212421;
border: 1px solid #999;
}

4.  Now, search this code (Ctrl + F), </head>

5.  Copy below code and paste it just before the </head> tag.
<script src='http://ajax.googleapis.com/ajax/libs/jquery/1.3.2/jquery.min.js' type='text/javascript'/>

<script type='text/javascript'>
//<![CDATA[
$(document).ready(function(){var currentPosition=0;var slideWidth=560;var slides=$('.slide');var numberOfSlides=slides.length;$('#slidesContainer').css('overflow','hidden');slides.wrapAll('<div id="slideInner"></div>').css({'float':'left','width':slideWidth});$('#slideInner').css('width',slideWidth*numberOfSlides);$('#slideshow').prepend('<span class="control" id="leftControl">Clicking moves left</span>').append('<span class="control" id="rightControl">Clicking moves right</span>');manageControls(currentPosition);$('.control').bind('click',function(){currentPosition=($(this).attr('id')=='rightControl')?currentPosition 1:currentPosition-1;manageControls(currentPosition);$('#slideInner').animate({'marginLeft':slideWidth*(-currentPosition)})});function manageControls(position){if(position==0){$('#leftControl').hide()}else{$('#leftControl').show()}if(position==numberOfSlides-1){$('#rightControl').hide()}else{$('#rightControl').show()}}
});
//]]>

6. Save your template. Now go to your Dashboard >> Design >> Page Element >> Add a Gadget >> 'HTML/Javascript'.

7.  Add the code below;
<!-- Slideshow HTML START-->
<div id="contentSlide"><div id="slideshow">
<div id="slidesContainer">

<div class="slide">
<h2>CONTENT TITLE</h2>
<p><a href="POST URL"><img alt="" width="215" src="IMAGE URL" height="145"/></a>POST SUMMARY</p>
</div>

<div class="slide">
<h2>CONTENT TITLE</h2>
<p><a href="POST URL"><img alt="" width="215" src="IMAGE URL" height="145"/></a>POST SUMMARY</p>
</div>

<div class="slide">
<h2>CONTENT TITLE</h2>
<p><a href="POST URL"><img alt="" width="215" src="IMAGE URL" height="145"/></a>POST SUMMARY</p>
</div>

<div class="slide">
<h2>CONTENT TITLE</h2>
<p><a href="POST URL"><img alt="" width="215" src="IMAGE URL" height="145"/></a>POST SUMMARY</p>
</div>

<div class="slide">
<h2>CONTENT TITLE</h2>
<p><a href="POST URL"><img alt="" width="215" src="IMAGE URL" height="145"/></a>POST SUMMARY</p>
</div>

</div>
</div></div>
<!-- Slideshow HTML END -->

8.  To add new slideshow, just add this code;
<div class="slide">
<h2>CONTENT TITLE</h2>
<p><a href="POST URL"><img alt="" width="215" src="IMAGE URL" height="145"/></a>POST SUMMARY</p>
</div>

DONE!

How To Add Colorful Effect For Your Links For Blogger


Let's add some fun to your blog by adding cool effect to your links when your visitors hover it. It’ll be lighting and colorful. It's easy and let's do it.


How To Add Image Magnifier in Blogger

This the creative hack to enlarge or zoom image in blogger. With this hack, you will be able to zoom in the image in blogger by clicking on the image. It's a simple hack. Only need a few steps to add it into your blog.


#STEPS:
1. Go to your Dashboard >> Design >> Edit HTML.

2. Search this code (Ctrl + F), </body>

3. Copy and paste this just CODE above </body> tag.

4. Save your template.

How to apply Image Magnify:

1. Add this class="magnify" data-magnifyby="1.5"  on each image you want to magnify. 

2. You need to go to Edit HTML section instead of Compose section. Example :
<img class="magnify" data-magnifyby="1.5" src="Image URL" />
3. Finish.

Nice and easy. :)

Add Speech Bubbles Tooltip in Blogger

What is Speech Bubbles Tooltip?

Description : Speech Bubbles Tooltip lets you add tooltips to links using either the value of the link's title attribute, or rich HTML defined all inside a single HTML file and fetched using Ajax instead.


Now, let's add it to your blog.

Change Newer Posts and Older Posts with Post Titles like Worpress

Do you want to change your Newer Posts and Older Posts with your Post titles? We always see this trick only in wordpress blogs. But now, you can apply it into your blog. It also can attract more reader because they can stop to see your post title. Let's try it. Just in 3 steps.


Example : After apply the hack code