How To Make Facebook Like Box Like Wordpress

Wanna have Facebook Like Box like this? Just like in Wordpress. Watch DEMO [click]


You only need to follow this few steps. Let's start.

INSTRUCTION:
1. Go to your Dashboard >> Design >> Page Element >> Add a Gadget.


2. Paste this code in.
<center>
<iframe frameborder="0" href="%0A%0AYOUR FAN PAGE URL%0A%0A" scrolling="no" src="http://www.facebook.com/plugins/fan.php?id=%0A%YOUR FAN PAGE ID%0A%0A&amp;width=292&amp;height=250&amp;connections=25&amp;stream=false&amp;header=false&amp;logobar=false&amp;css=http://howtohouse.googlecode.com/files/fblike.css" style="height: 230px; width: 85%;"></iframe>
<iframe allowtransparency="true" frameborder="0" scrolling="no" src="http://www.facebook.com/plugins/like.php?href=%0A%0AYOUR FAN PAGE URL%0A%0A&amp;send=false&amp;layout=standard&amp;width=292&amp;show_faces=false&amp;action=like&amp;colorscheme=light&amp;font&amp;height=40" style="border: none; height: 40px; overflow: hidden; width: 250px;"></iframe></center>
3. Change:
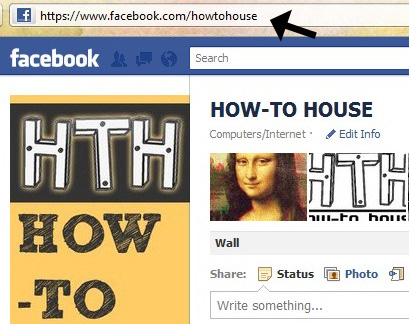
YOUR FAN PAGE URL- Where to find? Just go to your fan page. Copy URL in the URL bar.


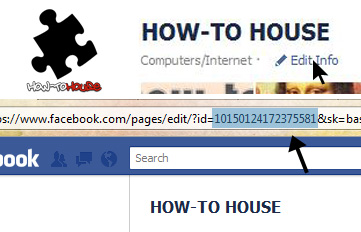
YOUR FAN PAGE ID - On your fan page, click on the Edit Info and copy the ID from the URL bar.


4. Save and FINISH!

Do you like it? ENJOY!

Add Follow and Dashboard Button Like Tumblr in Blogger

Do you like a follow and dashboard button just like in Tumblr? It's look like this;


Live DEMO [click]. Isn't its nice. Let's add it to your blog/site.

STEPS
1. Go to your Dashboard >> Design >> Page Element >> Add a Gadget.


2. Paste this code in.
<div style="display:scroll; position:fixed; top:5px; right:95px;"><a class="linkopacity" href="http://www.blogger.com/follow-blog.g?blogID=YOUR BLOG ID" target="_blank" rel="nofollow" title="Follow" imageanchor="1" style="margin-left: 1em; margin-right: 1em;"><img border="0" src="http://assets.tumblr.com/images/iframe_follow_alpha.png?6" /></a> <div style="display:scroll; position:fixed; top:5px; right:2px;"><a class="linkopacity" href="http://blogger.com/home" target="_blank" rel="nofollow" title="Dashboard" imageanchor="1" style="margin-left: 1em; margin-right: 1em;"><img border="0" src="http://assets.tumblr.com/images/iframe_dashboard_alpha.png?6" /></a></div></div>
3. Change the YOUR BLOG ID with your Blogger. Where to find the ID?

    • Go to Dashboard ->> Design ->> Look at your URL bar.


4. Save and finish.

Enjoy new Tumblr style button.

How To Disable Image Lightbox in Blogger

Blogger previously has officially launched a lightbox image viewer in Blogger. I had wrote about it in the previous entry. For further info, click here.

But some of the user seems don't like to use it. Want to disable it? Let's know how.

Steps
Log in to Blogger -> Settings | Posts and Comments section (new interface) or the Settings | Formatting section (old interface).

Select “No” next to Lightbox.

• Finish!

Hope you like it!

Spread this entry if you think it's helpful.

How To Create Your Own Clock and Add in Blogger

You wanna add some widget like clock. You can do it so. It is good to have a clock in your blog. Time is always important. You can create your own clock and add it into your blog. Let's know how yo.
Let's get started

• Just go this site - click here

• Then, just select between listbox options.

• Customize colors with color pickers.

• Set your clock size with zoom slide.

• Hit the Download button.

• Copy the code and paste in HTML/Javascript

• Finish!

Place the clock on your desire position. Enjoy!

How To Get Email Notification When Someone Submit Form in Google Docs

Assalamualaikum~

In the previous tutorial, we learn to create a free form with Google docs. But some user ask me how to get notify if someone submitted form. We can get notify as soon as possible the form submitted. So, let's know it.

GET EMAIL NOTIFICATION
1. Go to your Google Docs homepage. Click on your form.

2. New tab will be open. Go to Tools tab -> Notification Rules


3. Then, just click on the Any change are made and email - right away.


4. Save. Yes, you done!

After this, if your form submitted, you will get the email notification right away.

How To Create Free Form in Blogger

You just need to use Google Docs. Web forms in Google Docs are a great choice for creating forms like Contact Me/Contact Us or for conducting polls and surveys since it's free and no limits of people can participate. It is also great because all replies are directly saved in an online spreadsheet. It becomes more easy to analyze your own data.


How To Create jQuery Content Slider in Blogger

Do you know what is content slider? It's like a slideshow. You can watch the demo.


Like it? Let's add it.

Steps:
1. Go to your Dashboard >> Design >> Edit HTML >> Check Expand Widget Templates.

2. Search this code (Ctrl + F), ]]></b:skin>

3. Copy below code and paste it just before the ]]></b:skin> tag.
#contentSlide {
border: 1px solid #000;
background:#212421;
height:263px;
padding:10px 0;
}
#slideshow {
margin:0 auto;
width:640px;
height:263px;
background:transparent url(http://lh6.ggpht.com/_dfnTVAxeWMI/SlTPJpS_axI/AAAAAAAABYA/JS60KVWJ9GQ/bg_slideshow.jpg) no-repeat 0 0;
position:relative;
}
#slideshow #slidesContainer {
margin:0 auto;
width:560px;
height:263px;
overflow:auto; /* allow scrollbar */
position:relative;
}
#slideshow #slidesContainer .slide {
margin:0 auto;
width:540px; /* reduce by 20 pixels of #slidesContainer to avoid horizontal scroll */
height:263px;
}
.control {
display:block;
width:39px;
height:263px;
text-indent:-10000px;
position:absolute;
cursor: pointer;
}
#leftControl {
top:0;
left:0;
background:transparent url(http://lh6.ggpht.com/_dfnTVAxeWMI/SlT8KH99FgI/AAAAAAAABZM/e9gXvHjzltU/control_left.jpg) no-repeat 0 0;
}
#rightControl {
top:0;
right:0;
background:transparent url(http://lh6.ggpht.com/_dfnTVAxeWMI/SlT8KMpFpxI/AAAAAAAABZQ/a207Rx0XuiU/control_right.jpg) no-repeat 0 0;
}

.slide h2, .slide p {
margin:15px;
}
.slide h2 {
font:italic 24px Georgia, "Times New Roman", Times, serif;
color:#212421;
letter-spacing:-1px;
}
.slide img {
float:right;
margin:0 15px;
padding: 1px;
background-color: #212421;
border: 1px solid #999;
}

4.  Now, search this code (Ctrl + F), </head>

5.  Copy below code and paste it just before the </head> tag.
<script src='http://ajax.googleapis.com/ajax/libs/jquery/1.3.2/jquery.min.js' type='text/javascript'/>

<script type='text/javascript'>
//<![CDATA[
$(document).ready(function(){var currentPosition=0;var slideWidth=560;var slides=$('.slide');var numberOfSlides=slides.length;$('#slidesContainer').css('overflow','hidden');slides.wrapAll('<div id="slideInner"></div>').css({'float':'left','width':slideWidth});$('#slideInner').css('width',slideWidth*numberOfSlides);$('#slideshow').prepend('<span class="control" id="leftControl">Clicking moves left</span>').append('<span class="control" id="rightControl">Clicking moves right</span>');manageControls(currentPosition);$('.control').bind('click',function(){currentPosition=($(this).attr('id')=='rightControl')?currentPosition 1:currentPosition-1;manageControls(currentPosition);$('#slideInner').animate({'marginLeft':slideWidth*(-currentPosition)})});function manageControls(position){if(position==0){$('#leftControl').hide()}else{$('#leftControl').show()}if(position==numberOfSlides-1){$('#rightControl').hide()}else{$('#rightControl').show()}}
});
//]]>

6. Save your template. Now go to your Dashboard >> Design >> Page Element >> Add a Gadget >> 'HTML/Javascript'.

7.  Add the code below;
<!-- Slideshow HTML START-->
<div id="contentSlide"><div id="slideshow">
<div id="slidesContainer">

<div class="slide">
<h2>CONTENT TITLE</h2>
<p><a href="POST URL"><img alt="" width="215" src="IMAGE URL" height="145"/></a>POST SUMMARY</p>
</div>

<div class="slide">
<h2>CONTENT TITLE</h2>
<p><a href="POST URL"><img alt="" width="215" src="IMAGE URL" height="145"/></a>POST SUMMARY</p>
</div>

<div class="slide">
<h2>CONTENT TITLE</h2>
<p><a href="POST URL"><img alt="" width="215" src="IMAGE URL" height="145"/></a>POST SUMMARY</p>
</div>

<div class="slide">
<h2>CONTENT TITLE</h2>
<p><a href="POST URL"><img alt="" width="215" src="IMAGE URL" height="145"/></a>POST SUMMARY</p>
</div>

<div class="slide">
<h2>CONTENT TITLE</h2>
<p><a href="POST URL"><img alt="" width="215" src="IMAGE URL" height="145"/></a>POST SUMMARY</p>
</div>

</div>
</div></div>
<!-- Slideshow HTML END -->

8.  To add new slideshow, just add this code;
<div class="slide">
<h2>CONTENT TITLE</h2>
<p><a href="POST URL"><img alt="" width="215" src="IMAGE URL" height="145"/></a>POST SUMMARY</p>
</div>

DONE!

Blogger Released Official Lightbox Image Viewer System

Do not need to use any hack code to magnify the image on blogger blog anymore. Now Blogger.com has provided the official Lightbox image viewer system. You can take a look at your blog. Just click on the image on your entry post, then it will magnify itself and there is also has image thumbnail under the preview image to select which image you want to look at.


Just click on the [x] button at the right top corner or just click on the dark area to back to normal.

Interesting!

You also can disable this feature - tutorial here.

How To Add Colorful Effect For Your Links For Blogger


Let's add some fun to your blog by adding cool effect to your links when your visitors hover it. It’ll be lighting and colorful. It's easy and let's do it.


How To Add Page Navigation to Blogger


Page navigation script will replaces the default blog pager (links to newer, older and home pages) with numbered page navigation. Furthermore, it offers the ability to customize the number of page links and the number of posts displayed on each page. It gives you more easy to discover your old entry. Let's know how.