How To Boost PC Transfer Rate

If you think your PC transfer rate is not fast enough, you can boost your transfer rate speed using Teracopy. One of the most common complaints about newer versions of Windows is the slow copying speed, especially when transferring lots of files over the network. If you want to speed up your copying or if you regularly transfer large amounts of data and have to stop the process to perform some other disk-intensive task, this program may be just what you need.

TeraCopy is designed to copy and move files at the maximum possible speed. It skips bad files during the copying process, and then displays them at the end of the transfer so that you can see which ones need attention. TeraCopy can automatically check the copied files for errors by calculating their CRC checksum values. It also provides a lot more information about the files being copied than its Windows counterpart. TeraCopy integrates with Windows Explorer's right-click menu and can be set as the default copy handler.
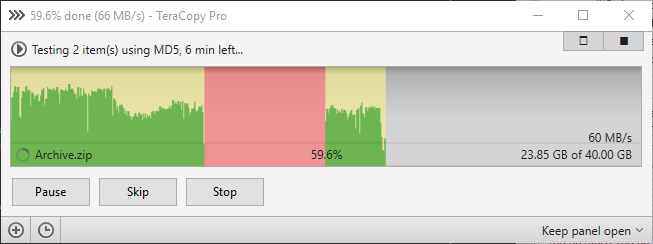
Teracopy screenshot

FEATURES:
• Copy files faster
TeraCopy uses dynamically adjusted buffers to reduce the seek times. Asynchronous copying speeds up the file transfer between two physical hard drives.

• Pause and resume file transfer activities
Pause the copy process at any time in order to free up system resources and continue with a single click.

• Error recovery
In case of a copy error, TeraCopy will try several times to recover and, in the worse case scenario, will simply skip the file, not terminating the entire transfer.

• Interactive file list
TeraCopy shows the failed file transfers and lets you fix the problem and recopy only the problem files.

• Shell integration
TeraCopy can completely replace the Explorer copy and move functions, in turn enabling you to work with files as usual.

• Full Unicode support.

• Windows 8 x64 support.

DOWNLOAD: TERACOPY | 1.8MB

[source]

How To Hide Facebook Fan Page at the Sidebar in Blogger

Usually, you will find a Facebook fan page at the sidebar or footer. Now can hide your Facebook Fan Page widget. Wonder how? Look at the demo.

DEMO

LET'S ADD IT
1. Go To Dashboard >> Design ->> Edit HTML

2. Check the "Expand Widget Templates" box

3. Search (Ctrl+F) for </head> tag,


4. Then, copy and paste the code below, BEFORE </head> tag,
<script src='https://ajax.googleapis.com/ajax/libs/jquery/1.6.1/jquery.min.js' type='text/javascript'/>
*If you already have the code in your template, just ignore step no 4.

5.  Save your template.

6. Now go to your Dashboard >> Design >> Page Element >> Add a Gadget.


7. Paste this code in.
<script type="text/javascript">
//<!--
$(document).ready(function() {$(".w2bslikebox").hover(function() {$(this).stop().animate({right: "0"}, "medium");}, function() {$(this).stop().animate({right: "-250"}, "medium");}, 500);});
//-->
</script>
<style type="text/css">
.w2bslikebox{background: url("https://blogger.googleusercontent.com/img/b/R29vZ2xl/AVvXsEiOJAulO_Ts98rfyr2Pk70vnyzWdH6e8LfKZtY4lx4D0g4I4rucN3OixhMYAeZvg8keaZYH5-Yu0HgF52PtEoCDqEuKWbSKAp1Z6ybOL1VhkqWpMauGd_wxiPpPkW2ZZRndp0ctu8hDd_w/s150/HHLab_facebookbadgeBlue.png") no-repeat scroll left center transparent !important;display: block;float: right;height: 270px;padding: 0 5px 0 46px;width: 245px;z-index: 99999;position:fixed;right:-250px;top:20%;}
.w2bslikebox div{border:none;position:relative;display:block;}
.w2bslikebox span{bottom: 12px;font: 8px "lucida grande",tahoma,verdana,arial,sans-serif;position: absolute;right: 6px;text-align: right;z-index: 99999;}
.w2bslikebox span a{color: #808080;text-decoration:none;}
.w2bslikebox span a:hover{text-decoration:underline;}
</style><div class="w2bslikebox" style=""><div>

<iframe src="http://www.facebook.com/plugins/likebox.php?href=YOUR FAN PAGE URL&amp;width=245&amp;colorscheme=light&amp;show_faces=true&amp;connections=9&amp;stream=false&amp;header=false&amp;height=330" scrolling="no" frameborder="0" style="border: medium none; overflow: hidden; height: 330px; width: 245px;background:#fff;"></iframe></div></div>
*YOUR FAN PAGE URL = Put your Facebook Fan Page URL

8. You can change the facebook logo with another color given below, or use your own image.


GREEN: https://blogger.googleusercontent.com/img/b/R29vZ2xl/AVvXsEg1Kx77REUIhvBAc5WY4G9hxVPJVFA2HwL6x2RmnrST_Mf48maj9VLV2IcOA7DyHCXf8WxjI37_O7fJWqyEJjDyVFkLt0NJ8-9XxLg78J5l3xH1-8BmGGGyJCQtSyiPXalei-5wrjn7KV0/s150/crb_facebookbadge.png

PINK: https://blogger.googleusercontent.com/img/b/R29vZ2xl/AVvXsEgZCYQZsDfIj3_a1UBrWL3DZGUJ3fn7m6BpaOGNI8qIuDUvcPMBznnpOY_QBhbgoEb4D_nWzDiR3OCPq-aGBin6LsucDV9hQPSsAKS4JT-9YQdcYbT2SXGxZt1E0VJhDpmzHSrDFsKcXNo/s150/mhw_facebookbadge.png

9. Save. You're done.

Refresh your blog to see the result. =)

+ Leave your comment.

How To Unlink Fanbox From Facebook Account

For Fanbox user, if you link your facebook with fanbox. All your activity in Fanbox will be showm in Facebook. Sometimes it's annoying. If you want to unlink Fanbox from Facebook, just simply follow this step.

UNLINK FANBOX FROM FACEBOOK
1. In facebook at the left side, under Apps column. Find Fanposts. Click on it.


2. If you can't find it, click "More" button next to Apps. Then, search for Fanposts.


3. Then, just click on "Turn off automatic post".


4. Finish!


Happy blogging! :)

How To Create a Fake PC Virus

Wanna make some fun with your friends? How about create a fake virus and put it their desktop. Wait and see their reaction. LOL.


CODE:
X=MsgBox("Message Description",0+16,"Title")

1. You can write any number from 1,2,3 or 4 instead of 0 (before the '+' symbol) and here is the meaning of these numbers:

0 = OK Button,
1 = OK / Cancel Button,
2 = Abort / Retry / Ignore Button,
3 = Yes / No / Cancel Button,
4 = Yes / No Button,


2. You can write 32 or 48 or 16 instead of 64. Here is the meaning of each number:

16 = Critical Icon,
32 = Help Icon,
48 = Warning Icon,
64 = Information Icon,

Make sure you add ".vbs" after the name.

Finish. Have fun. :)

credit: HatifHammad

How To Embed Youtube Video in Blogger

This is the simple tutorial for those are new to blogging world. You can embed any video from Youtube  in your blog. You only need to follow this few step.

EMBED YOUTUBE VIDEO IN BLOGGER
1. Go to any Youtube video URL that you want to embed in your blog.

2. Click "Share" button,


3. Click "Embed" and copy the embed code.


- You also can customize video width and height before you copy the embed code.


4. Then, go to your post editor area. In Edit HTML section, paste the embed code in. Then go back to Compose section.


5. That's it. Finish!

Now, you can embed any of your favorite video in your blog. Hope you love it! :)

How To Block Pornography Content From Internet

Believe or not, 70% material on the internet is pornography. So, parents need to control their children from surfing this material. But you don't have 24 hours only to control your child from surfing internet. What should you do? You only need the tool called Salfeld Child Control. This software will block any porno content from the internet.

Computers are the place for children. This is the place where they can sharpen their agility as well as their abilities. They can learn and make new friends. What’s more, the Internet provides information for homework assignments. So far, so good. But they also need to be protected from the computer—for one thing, so that they don’t lose their sense of time and forget to go out and play with their friends once in a while, and for another, because of the dangers lurking on the Web. That’s why responsible parents everywhere install Child Control on every computer that their children use.


FEATURES:
• Easy to setup and manage
• Limit times for PC and Internet usage
• Limit times on single *.exe and URLs
• Powerful Internet Filter/Blacklists
• Block Filesharing and Downloads
• Restrict System Settings/Folders
• E-Mail Report and Internet Remote
• Access from any Internet/Browser PC
• 24 months free updates

OVERVIEW:


DOWNNLOAD:

Salfeld.Child.Control | 18MB

Protect your children from negative materials.

How To Integrate Facebook Comment Box in Blogger

Recently Facebook has launched many social plugins and web developers for bloggers. Their much improved Facebook comment box. Facebook comment box is one of the useful tool for bloggers to increase conversations. So, if you interested to integrate Facebook comment box on your blog and change blogger comment into Facebook comment box? This entry is just exact for you. Let's do it.

Note : Before make any changes, back up your template.

1. Visit Facebook Developer Page. Enter your blog name, URL and click on Create application.


2. After that, copy the APP ID.


3. Then, go to Edit Setting


4. If you using blogspot, follow below instruction,


5. But if you using other domain like .com, follow instruction below,


6. Save your App.


ADD FACEBOOK COMMENT BOX

1. Go To Blogger >> Design ->> Edit HTML

2. Check the "Expand Widget Templates" box


3. Search for <html and just after it add this code,

xmlns:fb='http://www.facebook.com/2008/fbml'

4. Now search (Ctrl+F) for,
<body>

5. Just after it, add the below code,
<div id='fb-root'/>
<script>
    window.fbAsyncInit = function() {
    FB.init({
      appId  : &#39;YOUR_APP_ID&#39;,
      status : true, // check login status
        cookie : true, // enable cookies to allow the server to access the   session
      xfbml  : true  // parse XFBML
    });
  };
    (function() {
    var e = document.createElement(&#39;script&#39;);
      e.src = document.location.protocol     &#39;//connect.facebook.net/en_US/all.js&#39;;
    e.async = true;
      document.getElementById(&#39;fb-root&#39;).appendChild(e);
    }());
</script>

6. Change YOUR_APP_ID with your App ID number.

7. And then, search (Ctrl+F) </head> and just above it paste the below code,
<meta expr:content='data:blog.pageTitle' property='og:title'/>
<meta expr:content='data:blog.url' property='og:url'/>
<meta content='YOUR BLOG NAME' property='og:site_name'/>
<meta content='BLOG-LOGO-IMAGE-LINK' property='og:image'/>
<meta content='YOUR_APP_ID' property='fb:app_id'/>
<meta content='http://www.facebook.com/YOUR _FACEBOOK_USERNAME' property='fb:admins'/>
<meta content='article' property='og:type'/>

Replace the red code with your details.

8. Now, search (Ctrl+F) for this ;
<b:includable id='comment-form' var='post'>

9. After it paste the code given below,
<b:if cond='data:blog.pageType == &quot;item&quot;'>
<div style='padding:0px 0px 0px 0px; margin:0px 0px 0px 0px;'><script src='http://connect.facebook.net/en_US/all.js#xfbml=1'/>
<div> <fb:comments  colorscheme='light' expr:href='data:post.url' expr:title='data:post.title' expr:xid='data:post.id' width='520'/></div>
</div>
</b:if>

If you want to use the dark scheme replace light with dark

To change the comments box width, change this value width='520'

#UPDATE
10. Search (Ctrl+F) <fb:comments

11. Replace it with,
<script src='http://connect.facebook.net/en_US/all.js#xfbml=1'/> <fb:comments migrated='1'
12. Save your template.


HIDE BLOGGER COMMENT

Now you need to hide default blogger commenting system. So navigate to Settings > Comments and select hide and save settings.


DONE! See the result.

With this, your previous blogger comment will be hidden.


Do you like it? Recommend it!

How To Enable Threaded Comment in Blogger Custom Template

Recently, blogger had update new feature which is threaded comment. If you use template from blogger you will see your blogger comment in threaded style. So, if you want to add threaded comment in costume template, just follow this instruction.


APPLY THREADED COMMENT IN COSTUME TEMPLATE
1. Go to Dashboard ->> Layout ->> Edit HTML

2. Search this code (Ctrl + F),
<b:if cond='data:blog.pageType == &quot;item&quot;'>
  <b:include data='post' name='comments'/>
</b:if> 
#maybe this code will appear twice.

3.Replace it with this code,
<b:if cond='data:blog.pageType == &quot;static_page&quot;'>
<b:if cond='data:post.showThreadedComments'>
<b:include data='post' name='threaded_comments'/>
<b:else/>
<b:include data='post' name='comments'/>
</b:if>
</b:if>
<b:if cond='data:blog.pageType == &quot;item&quot;'>
<b:if cond='data:post.showThreadedComments'>
<b:include data='post' name='threaded_comments'/>
<b:else/>
<b:include data='post' name='comments'/>
</b:if>
</b:if>
#so replace the provided code twice.

4. Customize your threaded comment, search (Ctrl+F) this tag,

<b:includable id='threaded_comment_css'>
.
.
.
.
until </b:includable>

6. And then replace it with  this CSS [click].

7. Save your template. Refresh your blog to see the result.

Any problem, just leave your comment. :)

Add Recent Comment with Avatar Widget in Blogger

Recent Comments widget with Avatar for Blogger. Recently Blogger updated the Comments API for Threaded Comments on Blogger . That's how the Avatar of Commenter showed using the updated the Comments API. HOW-TO HOUSE also use this widget. Let's know how.


HOW TO INSTALL
1. Go to your Dashboard >> Design >> Page Element >> Add a Gadget.


2. Paste this code in.
<style type="text/css">
    ul.w2b_recent_comments{list-style:none;margin:0;padding:0;}
    .w2b_recent_comments li{background:none !important;margin:0 0 6px !important;padding:0 0 6px 0 !important;display:block;clear:both;overflow:hidden;list-style:none;}
    .w2b_recent_comments li .avatarImage{padding:3px;background:#fefefe;-webkit-box-shadow:0 1px 1px #ccc;-moz-box-shadow:0 1px 1px #ccc;box-shadow:0 1px 1px #ccc;float:left;margin:0 6px 0 0;position:relative;overflow:hidden;}
    .avatarRound{-webkit-border-radius:100px;-moz-border-radius:100px;border-radius:100px;}
    .w2b_recent_comments li img{padding:0px;position:relative;overflow:hidden;display:block;}
    .w2b_recent_comments li span{margin-top:4px;color: #666;display: block;font-size: 12px;font-style: italic;line-height: 1.4;}
</style>
<script type="text/javascript">
//<![CDATA[
    // Recent Comments Settings
    var
    numComments     = 5,
    showAvatar     = true,
    avatarSize     = 50,
    roundAvatar    = true,
    characters     = 40,
    defaultAvatar     = "http://www.gravatar.com/avatar/?d=mm",
    hideCredits    = false;
//]]>
</script>
<script type="text/javascript" src="http://bloggerblogwidgets.googlecode.com/svn/trunk/w2b-recent-comments-w-gravatar.js"></script>
<script type="text/javascript" src="YOUR BLOG URL/feeds/comments/default?alt=json&callback=w2b_recent_comments&max-results=5"></script>

3. Replace the red code;

numComments     = 5,
• Number of the comment you wanna show

showAvatar     = true,
• set true tor show avatar, false to hide avatar

avatarSize     = 50,
• size px of the avatar

roundAvatar    = true,
true for rounded avatar, false for square avatar

characters     = 40,
• comment word

defaultAvatar     = "http://www.gravatar.com/avatar/?d=mm",
• Change the URL for new default avatar. Leave it if don't feel wanna change it.

YOUR BLOG URL
• Change it to your BLOG URL (necessary)

4. Save it. You're done.

or you can easily use this way2blogging widget generator


Enjoy guys! Leave your comment.

PES 2012 Tricks & Skills Tutorial

Frankly speaking, I still cant play PES 2012 as better I played PES 2011. I feel a bit hard to compete the opponent in this 2012. But with this tricks and skills tutorial will help us to beat the opponent and try to  fool them as we can. So, let the tutorial begins.


What your best scoreboard result against the opponent? Dare to share! LOL

How To Take Penalty in PES 2012 (Tutorial)

In PES 2011, penalty shoot-out goes mith a different style. For PES 2012, it goes with normal penalty shoot-out as like previous PES 2010. But has a different setting to score a goal such as tricky shoot, direction. Watch this tutorial.


For more PES trick and tutorial - click here.

How To Create Upside Down Text


Do you want your text upside down on Facebook? Who said writing upside down is difficult? It's really easy as ABC. This is the example:


ǝldɯɐxǝ

HOW TO MAKE UPSIDE DOWN TEXT

1. Go to this site:


2. Type the words that you want to put on Facebook, just copy-paste the word into Facebook.

3. Walla. Just like ABC. Done!

So, you can hide you word from your reader or friend from to be read directly.

How To Add Rollover Social Icons in Blogger

This social icon widget include Facebook, Twitter and RSS. When you hover your cursor into the icon,it will rollover. Now, you can add it to your blog. Let's know how.


STEPS
1. Go to your Dashboard >> Design >> Page Element >> Add a Gadget.


2. Paste this code in.
<center>
<a href=http://www.facebook.com/username target="_blank" onmouseover= "if (document.images) document.facebook.src= 'https://blogger.googleusercontent.com/img/b/R29vZ2xl/AVvXsEiy1PxqwBAjpPw19wP5bqh4njwksJi9ahdH_BoMvdJ0T5YdwIE9CVEUA9vX_Of6u4CC5gaQzq2aEzkZWF1jh-_DSs4uZsduQ-x8c750bBL5LH8JIYY1mXykaeipRnvzt8eJendMYSVpOJIJ/s1600/facebook.png';" onmouseout= "if (document.images) document.facebook.src= 'https://blogger.googleusercontent.com/img/b/R29vZ2xl/AVvXsEhcvVjjFztelfqt53Bc1BQtVvreJUFnYz74t_OBJIJW9ZFh8Jx7YhNzILQ84R_rNuaOj4BweHdlpGtw37TPdxqVSZ75uTBsdS-Y8RnZDJwenmtJWAPnmAK7TjhTsiaFPaxYHeB30h1Zb887/s1600/facebook.png';"><img src="https://blogger.googleusercontent.com/img/b/R29vZ2xl/AVvXsEhcvVjjFztelfqt53Bc1BQtVvreJUFnYz74t_OBJIJW9ZFh8Jx7YhNzILQ84R_rNuaOj4BweHdlpGtw37TPdxqVSZ75uTBsdS-Y8RnZDJwenmtJWAPnmAK7TjhTsiaFPaxYHeB30h1Zb887/s1600/facebook.png" name="facebook" border="0" width="64" height="82"/></a><a target="_blank" href=http://twitter.com/username onmouseover= "if (document.images) document.twitter.src= 'https://blogger.googleusercontent.com/img/b/R29vZ2xl/AVvXsEgLwLJs9KTf37sfSMAaGdE4Nkkdzt7PeARhwlx54irqoRTnmkVw5otM7Fn8_00Tx2uc6s8lrKhZZAwXWNmdVXbN298RH6d8dGhShyVImtCCQ3Z2xCMMQWow_uXNHc2EIwmHxl5ht9TtxYpJ/s320/twitter.png';" onmouseout= "if (document.images) document.twitter.src= 'https://blogger.googleusercontent.com/img/b/R29vZ2xl/AVvXsEhkEYE2jB0N7NpzG4wtNE6ZqhcKWF8hvk4O2BcKIBA96DgisQ5HMmZa9z8h7V0EQbPaIJWBfHjVvpAISSicpdsGeLfFbkUdews8Zl_8wnV8oSpMXBmrQKYuve-fVOvQNVurrzPw-ybtmSiK/s1600/twitter.png';"><img src="https://blogger.googleusercontent.com/img/b/R29vZ2xl/AVvXsEhkEYE2jB0N7NpzG4wtNE6ZqhcKWF8hvk4O2BcKIBA96DgisQ5HMmZa9z8h7V0EQbPaIJWBfHjVvpAISSicpdsGeLfFbkUdews8Zl_8wnV8oSpMXBmrQKYuve-fVOvQNVurrzPw-ybtmSiK/s1600/twitter.png" name="twitter" border="0" width="64" height="82"/></a><a href=http://feeds.feedburner.com/username target="_blank" onmouseover= "if (document.images) document.rss.src= 'https://blogger.googleusercontent.com/img/b/R29vZ2xl/AVvXsEjCNPyNGcJm7o3OZexya2JC55pawjfwMIpbS7WQ2CskuOcTB8t4B2eO5nc4DsqVdWS3sPfLC3kw0FKe7m1iRff4fHOJBf70kw0N1OWiuSk5Gbgnk_hDZumsjR_ELm-85mVYfupnIg19H1sT/s1600/rss.png';" onmouseout= "if (document.images) document.rss.src= 'https://blogger.googleusercontent.com/img/b/R29vZ2xl/AVvXsEjmKtVnlWvGUIsKdpDsFiMk6NidzdZzonwd-3BxKcCOE4XkuDHAvAP6bLMCVYCjf-GjiwiZlgj2wB20hItpbCB1oZEEf495gypDCFfwJG8EYYjvNR3MD1pkBl6VJ-u0ekxiqWRi2NrtomF2/s1600/rss.png';"><img src="https://blogger.googleusercontent.com/img/b/R29vZ2xl/AVvXsEjmKtVnlWvGUIsKdpDsFiMk6NidzdZzonwd-3BxKcCOE4XkuDHAvAP6bLMCVYCjf-GjiwiZlgj2wB20hItpbCB1oZEEf495gypDCFfwJG8EYYjvNR3MD1pkBl6VJ-u0ekxiqWRi2NrtomF2/s1600/rss.png" name="rss" border="0" width="64" height="82"/></a>
</center>

3. Replace the red code with your Facebook, Twitter and RSS URL.

4. Save. Finish! You're done.


Enjoy your rollover social icon guys! :)

How To Add jQuery Scroll To Top Widget in Blogger

This widget is made your visitor to easier scroll to top of the page by click on it. It's nice and smooth. It only show up when you scroll the page. I also put this widget in HOW-TO HOUSE. So, let's add it now.

Add the Scroll to top jQuery script

1. Go to Dashboard ->> Design ->>; Edit HTML

2. Search this code (Ctrl + F), </head>

3. Then, paste the code below after </head>
<script src='https://ajax.googleapis.com/ajax/libs/jquery/1.6.1/jquery.min.js' type='text/javascript'/>
<style type='text/css'>#w2btoTop {display:none;text-decoration:none;position:fixed;bottom:10px;right:10px;overflow:hidden;width:51px;height:51px;border:none;text-indent:-999px;background:url(https://blogger.googleusercontent.com/img/b/R29vZ2xl/AVvXsEgIew84lw9wfOC__5ePUsgUnngc9cNyD8BSLHHOOH-AaPvvZ89wW116AVi_W_7vhjJuc1X2EzqiXr19G00-fHILyqFhGLUIJv3WFPXkWl0xSakspIF04tprrK9WMR7eW7LUR65PUlm8uyGJ/) no-repeat left top;}#w2btoTopHover {background:url(https://blogger.googleusercontent.com/img/b/R29vZ2xl/AVvXsEgIew84lw9wfOC__5ePUsgUnngc9cNyD8BSLHHOOH-AaPvvZ89wW116AVi_W_7vhjJuc1X2EzqiXr19G00-fHILyqFhGLUIJv3WFPXkWl0xSakspIF04tprrK9WMR7eW7LUR65PUlm8uyGJ/) no-repeat left -51px;width:51px;height:51px;display:block;overflow:hidden;float:left;opacity: 0;-moz-opacity: 0;filter:alpha(opacity=0);}#w2btoTop:active, #w2btoTop:focus {outline:none;}</style><script src='http://bloggerblogwidgets.googlecode.com/files/w2b_jquery.ui.totop.js' type='text/javascript'/><script type='text/javascript'>$(document).ready(function(){ $().UItoTop({ easingType: &#39;easeOutCubic&#39; }); }); </script> 

4. Save your template.

Refresh your blog to see the result. Finish!

Protest on SOPA: Internet Blackout

The sites which protest against the SOPA (Stop Online Piracy Act). What is SOPA about? Read here. This sites blackout their site. The sites is included Wikipedia, Google, Firefox, Twitpic, Wordpress, Flickr, OpenDNS.


The online SOPA/PIPA protest (internet blackout) ends....for now.

The Wikipedia blackout is over — and you have spoken.

More than 162 million people saw our message asking if you could imagine a world without free knowledge. You said no. You shut down Congress’s switchboards. You melted their servers. From all around the world your messages dominated social media and the news. Millions of people have spoken in defense of a free and open Internet. For us, this is not about money. It’s about knowledge. As a community of authors, editors, photographers, and programmers, we invite everyone to share and build upon our work.

Our mission is to empower and engage people to document the sum of all human knowledge, and to make it available to all humanity, in perpetuity. We care passionately about the rights of authors, because we are authors. SOPA and PIPA are not dead: they are waiting in the shadows. What’s happened in the last 24 hours, though, is extraordinary. The internet has enabled creativity, knowledge, and innovation to shine, and as Wikipedia went dark, you've directed your energy to protecting it.

We’re turning the lights back on. Help us keep them shining brightly.

[source]

10 Reasons To Earn Money with FANBOX


Click on the image above for 10 Reasons to earn money with Fanbox. It's awesome. Fanbox is the best.

+ Any question? Leave your comment. (^_^)